St. Thomas E-Learning And Research - The Intersection of Technology and Pedagogy - Page 6
Best Practices, Tips, and Tricks, Technology Tools

Basic Video Production Tips and Tricks, Part 2

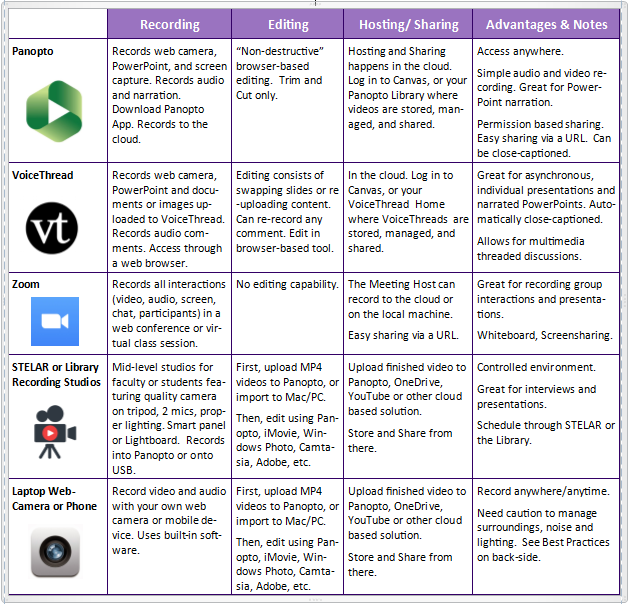
In a previous post, we looked at five basic video production tools available to faculty and students at St. Thomas.  In this article, I offer some best-practice tips to increase the production value of your recordings. Because videos are often viewed independently online, it’s easy for the viewer to get distracted or multitask while watching. While you don’t have to be a “rock-star” to keep their attention, there are some basic things you can do to make your videos more engaging.

Video Engagement” is a way to track views and retention. The main take-away is that if you want your students to view the entire video, keep it short (5-10 min. or less). If you have more content to cover, consider splitting it into a Part 1, Part 2, etc. Keep your message moving and provide appealing visuals to help carry the content and help students nurture meaning.

Here are ten more tips and tricks for increasing the production value of your audio/video recordings.

  1. Sketch, storyboard, or script your message before recording begins! Even though it’s more work, you’ll find that all your efforts will pay off in the overall quality and impact of your video.
  2. Good video can’t make up for bad audio! Use a good microphone and minimize extraneous noises. If people can’t hear clearly, you won’t get your message across no matter how awesome the video is.
  3. Use well-lit, well-balanced room lighting to light the subject but avoid shadows!  Be careful not to shine a harsh light directly on the subject, nor record in front of windows open to the sunlight.
  4. Control your environment as much as possible! This includes distracting room noise, visual distractions, people and pets. It’s best to be in a quiet, well-lit space.
  5. Frame the shot to capture what’s most important, and then some! Balance your subject in the shot so it’s large enough to be visible, but not too close to be distracting. A little background helps provide context.
  6. Think about what you’re wearing! Avoid wearing pin-stripes or anything distractable. Select clothing that will be in high contrast to the background so you don’t blend in or get lost in the background.
  7. Make sure the text is readable on all slides! Leave plenty of white-space around the text. Choose contrasting colors for text and images. Remember, each screen displays colors differently.
  8. Use headphones and a good microphone during live web-conference situations! This minimizes audio interference and feedback.
  9. All video content need to be close-captioned! This helps all learners. Check out the Close-Caption Request form on the STELAR website.
  10. Check out St. Thomas’ LinkedIn Learning for good examples of videos and tutorials that help with video recording, editing and producing.

Following a few simple tips can make all the difference between students actually watching what you produce, or just skipping through it. After all, if “content delivery” is the primary reason for creating videos, don’t give them a reason for not wanting to watch.

If you’re interested in getting the most out of your pre-recorded videos, but could use a little more guidance, feel free to contact STELAR to request a consultation around your next audiovisual recording project.

This post was written by Michael Wilder, an Instructional Designer for the St. Thomas E-Learning and Research (STELAR) Center at the University of St. Thomas in St. Paul, Minn. To learn more about this topic, please visit our website at www.stthomas.edu/stelar or email us at stelar@stthomas.edu.

Best Practices, Tips, and Tricks, Technology Tools

Utilizing Library Resources in Canvas

shelves full of books

St. Thomas has a handy tool for helping you integrate library resources into your Canvas sites. The Resource List is easy to set up, saves students money by using existing library resources, connects you with librarians who may be able to provide copyright guidance and management, and simplifies linking.

STELAR has just developed a self-paced, online Resource List training. This training will teach you how to set up your Resource List, add and link items, and identify special considerations such as accessibility and copyright.

For more information on reducing course materials costs for students, please see Greg Argo’s previous post: Reduce Course Materials Costs, We’ll Help.

This post was written by Nancy McGinley Myers, Instructional Designer with the St. Thomas E-Learning and Research (STELAR) Center at the University of St. Thomas in St. Paul, Minn. To learn more about this topic, please visit our website at www.stthomas.edu/stelar or email us at stelar@stthomas.edu. For more information on training available through STELAR, please see our Training & Events page.

Student Systems of Support

When A Student Has Tech Struggles: Tips for Instructors and Advisors 

Everywhere you look, technology holds a growing role in our lives. At the University of St. Thomas we provide an array of supports for students. Instead of a “one size fits all approach” to student tech support, we strive for personalized and responsive solutions since when it comes to technology since not everybody needs the same thing or accesses learning and technology in the same way.  

Our options run on a continuum from self-help, “do it yourself” resources to people-to-people (expert-guided) support. Options also include in-person, phone, email, live chat, 24/7 self-guided Tommie Tech, and 24/7/365 Canvas-specific support.  

Here are suggestions on how to help students find the range of technology supports available for their success.  

  • Point your students to Tommie Tech, a St. Thomas Canvas resource/tutorial site that helps students to find and use St. Thomas technologies, 24/7/365. You are welcome to give students the link that will allow them to self-enroll into this site. You can perhaps send a course announcement reminding them of this resource or post where you list other tech help information. If you tend to hear from certain students a lot about tech questions, guiding them to Tommie Tech may help address some of their needs and clear up their confusion. 
    • Graduate students can self-enroll in the Tommie Tech for Graduate Students Canvas site. Please share the link!  Fall 2019 is our first launch of this site, and students who explore the site are invited to share feedback that will help shape the site for spring 2020 and beyond.  
    • Undergraduate students can self-enroll in the Tommie Tech for Undergraduate Students Canvas site; all first-year undergraduate students are automatically enrolled in the site, but it is an option for all undergrads. 

And yet…Tommie Tech is just a part of the array of student supports at St. Thomas. If a student continues to have unaddressed tech needs or it seems like they would benefit from talking to a person right away, here are additional options. 

  • Ask students to contact Canvas 24/7/365 live chat or toll-free phone call if their technology need seems specific to Canvas (e.g., trouble uploading documents or media into Canvas, trouble opening something in Canvas). There are also Canvas Student Guides for the visual learner.  Click the Help button (question mark) on the far left, purple global navigation panel to call or chat. 

In addition to the “do it yourself” Tommie Tech Canvas site and Canvas 24/7 for Canvas specific needs, there is a range of additional ways to get personalized support from the St. Thomas Technology support team. 

  • Some students like the Email option. The St. Thomas Tech Desk can be reached at techdesk@stthomas.edu. When sending the tech desk your question, it may help to take a screenshot of your issue.
     
  • If you are on-campus and would like in-person Tech Help, please stop by! 
    • St Paul campus, stop by the Center for Student Achievement Technology Help desk (first floor of Murray-Herrick Hall, St Paul).   
    • Minneapolis campus, stop by 300 Schultz Hall 
    • Check locations and hours before making a trip to one of these locations. 
  • Phone St. Thomas Tech Help- Yes, some people still prefer talking on the phone!
    • Local (651) 962-6230 | Hours listed on Tech Desk Services page 
    • Toll-Free: (800) 328-6819 
    • On-campus: ext. 2-6230 (651-962-6230)
       
  • And students always have the 24/7 option to visit and explore the St. Thomas Innovations & Technology Services page

This post was written by Jo Montie, Online Learning Systems Facilitator and Peter Weinhold, Director of Academic Technology, with the St. Thomas E-Learning and Research (STELAR) Center at the University of St. Thomas in St. Paul, Minn. To learn more about this topic, please visit our website at www.stthomas.edu/stelar or email us at stelar@stthomas.edu

Technology Tools

Basic Video Production Tips and Tricks, Part 1

In my role as an Instructional Designer, I often get asked by faculty questions like: “How do I go about recording my lectures?” or “Can I record my PowerPoint slides and put them in my hybrid or online course?”

The simple answer, I’m happy to tell them, is “Yes!” This is a great way to provide an alternative to your in-class lectures and get you one step closer to moving toward a flipped format or a blended or online course should you choose to go there. Pre-recorded video content is becoming more common-place in higher education and for good reason. First, students can watch your lectures outside of class (flipped classroom model), regaining valuable class time for group problem-solving and team-work. Students can re-watch videos, pausing and rewinding for comprehension and review. And, all learners can benefit from having course materials that support multiple means of representation.

But knowing what to do and how to do it, are two different things completely (as my father would famously remind me).  In this article and the next, I would like to offer some basic video production tips and tricks as a starting point for creating the kind of video presentations you can be proud of.

Creating video content for course instruction and assignments generally involves these four stages (in order):

  1. Recording,
  2. Editing,
  3. Hosting, and
  4. Sharing

The good news is that St. Thomas faculty and students have several tools and resources available to them for creating and sharing quality video content for academic purposes (reference the table below). Most of these are easily accessed and described in more detail, on One.StThomas. Each tool has its own methods and capabilities, although there’s a surprising amount of overlap too.

To identify which tool or method may be best for the video content you want to produce, start by asking yourself these questions:

  • Do I need to display any material visually, or will students just need to see me?
  • What format is the material in that I need to display?  PowerPoint slides? Images or  Documents? Websites? Software application?
  • Will this be a one-way communication from me to my students, or do I want students to respond as they pause and comment directly in the video? (yeah, that’s a thing)
  • Do I need a controlled environment for the best quality sound and lighting?
  • Do I need to demonstrate some action or use props?
  • How will the students access and see the final presentation?

While this article focuses on basic video production tools, it should be noted that St. Thomas has a full-service video production studio in the basement of OEC. The ITS/STELAR team can assist with any high-level production needs beyond the scope of what’s covered here. It may also help to consult with a STELAR Instructional Designer who can guide you through the process and, based on your specific instructional needs, point you to specific tools and solutions.

Here’s a break-down comparing five basic video recording tools and methods available at St. Thomas.

Video Production Tools

Video Production Tools (Chart)


With a little planning and creativity, the tools in the chart above can provide you with everything you need to successfully create, edit, host, and share videos for course content and interaction.

In the next article, I’ll offer some best practices for getting the most out of your video and audio recording, so your students get the most out of learning by watching them.

This post was written by Michael Wilder, an Instructional Designer for the St. Thomas E-Learning and Research (STELAR) Center at the University of St. Thomas in St. Paul, Minn. To learn more about this topic, please visit our website at www.stthomas.edu/stelar or email us at stelar@stthomas.edu.

Student Systems of Support

Student Success Sites: Home Page as a Foundation

In this article, I introduce Strategy 2: How to create a clear home page and easy site navigation so students start and stick with it. This is the third in a series of Eight Strategies blog series for staff/faculty who create electronic orientation and learning resources for students.

There are several categories of Student Success Sites currently used at our university:

  • Onboarding sites to provide orientation at the beginning of a program or prior to a certain course;
  • Program community sites to provide connection to the people and information in a program once stakeholders have had an initial orientation; and
  • Knowledge, skills or competencies sites to teach a certain concept or subject area that is either program-specific or something that cuts across various program areas.

Home Page as a Strong Foundation

Using a physical home as a metaphor for the design of a home page may help to further leverage important elements at the beginning of a site.

When arriving home, it helps when we feel welcome, know what to expect, where to find things, and who is there to help! We want students to log in and immediately feel welcome since this will help them see this is a resource for them.

Students are more likely to start exploring the resource if their first visit to the home page helps them easily understand the reason to use the resource.

Furthermore,  students are more likely to stick with the resource and drill down beyond the home page if the site has clear navigation tips. A home base may also serve as a re-entry point or a familiar place to return back to; after all, there is no place like home.

Consider these examples to gain inspiration for crafting your own meaningful home page.  

Strategy 2 Home Base Examples:  

  • The Registration Readiness site, created by St. Thomas Academic Advising team members Susan Anderson, Drew Puroway, and colleagues, introduce new students to key first-year content electronically in a Canvas site before they come on campus for orientation and registration. At the top of the home page, there is a welcome message and clear communication about the purpose of the site and steps to get started.  

This Registration Readiness mini-course will prepare you to register for Fall semester classes when you attend Orientation and Registration (O&R) this summer.

    • Start by watching this welcome video on this home page;
    • Next, scroll down this home page and read all of this information;
    • Then, select the “Start Here” button at the bottom of this page to begin this mini-course.”

  • The Tommie Tech for Graduate Students site introduces new students to St. Thomas technology and includes recommended steps for getting the most out of the site. A welcome message from Dr. Ed Clark, Chief Information Officer at the University of St. Thomas, explains why this resource exists and how it may benefit them.

    The home page also includes a short video from a graduate student and additional navigational tips including pointing out a feature where pages will check off to help them keep track of which pages have been explored already. We know student time is important and want to point out helpful, time-saving features.
  • The Orientation to Online Learning site home page includes a 50-second captivating video of a student guide explaining why the site is important to their success in upcoming online classes. During the first two minutes on the site’s home page, students want to know the what, why, and how regarding the site. The home page also includes contact information for the site moderators (if you get stuck in the orientation site), and a clear Start Here and Navigation Tips section.

Wrap Up

The home page can serve as a foundation that students start with and may come back to multiple times. What you put on your home page will depend on your context and preferences for content organization. I hope that these examples further feed your own journey, and would welcome hearing from you about your examples!

This post was written by Jo Montie, Online Learning Systems Facilitator with the St. Thomas E-Learning and Research (STELAR) Center at the University of St. Thomas in St. Paul, Minn. To learn more about this topic, please visit our website at www.stthomas.edu/stelar or email Jo at jkmontie@stthomas.edu.