Michael Wilder – St. Thomas E-Learning And Research
All Posts By

Michael Wilder

Technology Tools

Active Social Reading via Leganto: A Game-changer!

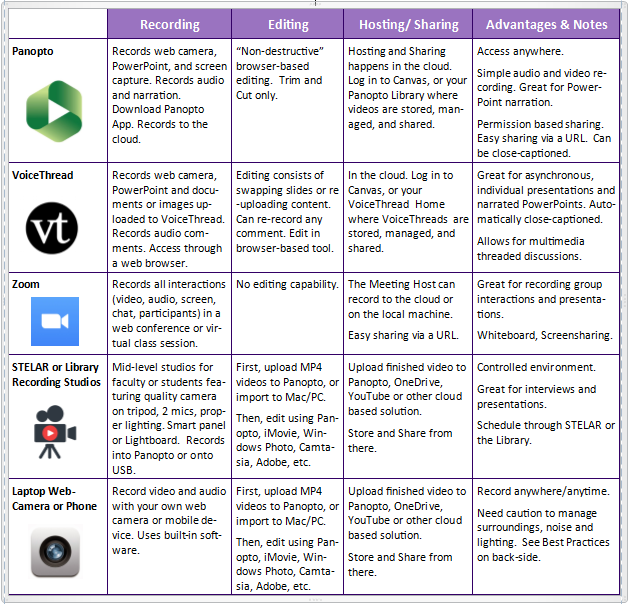
I’ve always believed that the Library is the university’s best-kept secret. That moniker is quite unfortunate because the Library is a prime extension of the classroom and the content in any university course. But for those who, like the University of St. Thomas, are integrating Leganto into their Learning Management System (LMS), the secret is out.

We’ve been incorporating Leganto Reading Lists in our Canvas LMS going on three years now. In my role as Instructional Designer, every time I consult with faculty on a new course development or redesign, I make sure we talk about the features and benefits of integrating a Leganto Reading List in their course site.

Not only is Leganto saving our students tens of thousands of dollars on course materials, but using Leganto insures compliance to copy-right and licensing factors, lessening the workload of busy faculty. Incorporating a Leganto Reading List gives our faculty an easy method of extending access to the great resources our Library system has had available all along.

Leganto's Social Reading

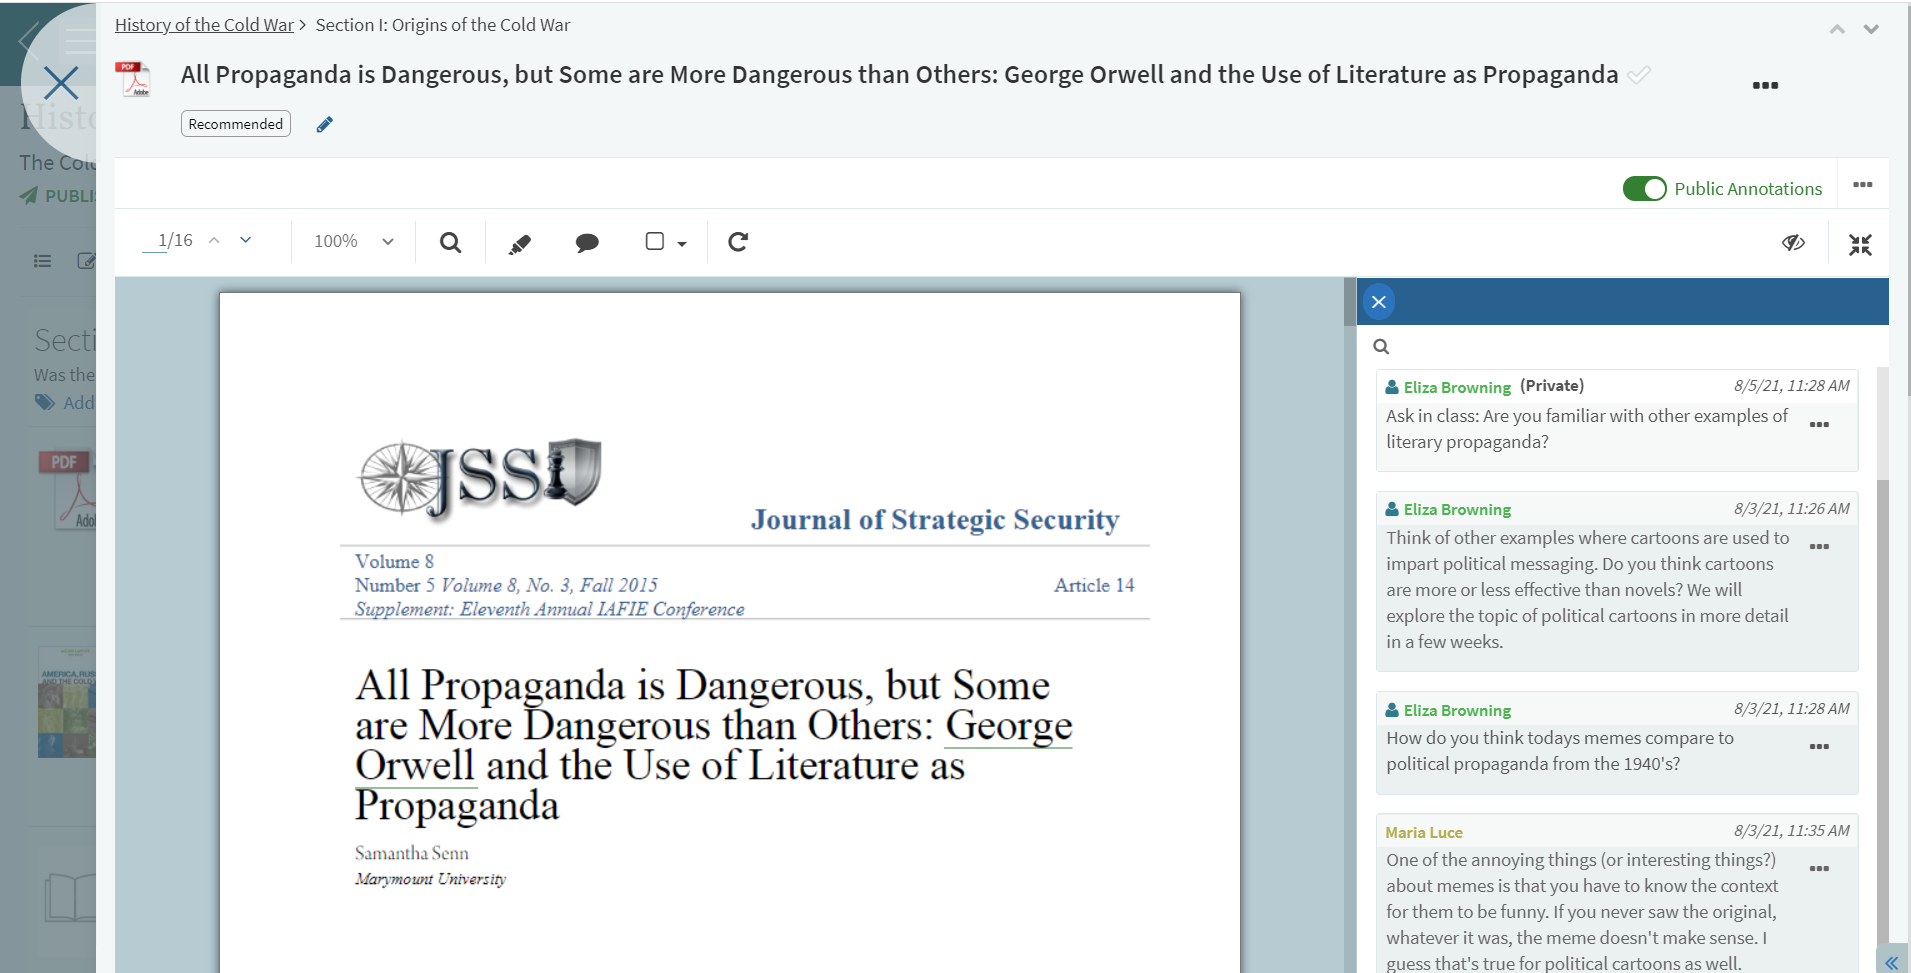
This fall, I’m excited to highlight several new features Leganto has engineered. Because I support faculty through a variety of course delivery formats, I try to focus their energy on student engagement strategies. In its newest release, Leganto adds the functionality of “social reading” to their rock-solid platform. This means a huge improvement over static syllabus reading because with social reading students are engaged not only with the content, but with each other. Students will be able to annotate and comment on PDF files a professor curates within Leganto. Students can engage with one another around topics of interest and annotations can be private or public (to others who have access to that resource).

In another release coming this fall, Leganto will add the ability to create Read & Respond assignments. This is a game-changer because it increases accountability among students for required readings in a course. With Read & Respond assignments, a professor can ask questions about specific content in a reading, and students will be able to demonstrate their understanding by highlighting, annotating, and commenting. Leganto readings now take center stage in the course and can be used as learning activities, formative assessments, and engagement strategies.

These new features extend the possibilities for students in all disciplines in socially connected and powerful ways. Because of the innovations Leganto brings to the table, I now have even more reasons to recommend Leganto Resource Lists to the faculty I work with.

This post was written by Michael Wilder, an Instructional Designer for the St. Thomas E-Learning and Research (STELAR) Center at the University of St. Thomas in St. Paul, Minnesota. To learn more about this topic, please visit our website at www.stthomas.edu/stelar or email us at stelar@stthomas.edu.

Best Practices, Tips, and Tricks, Technology Tools

Basic Video Production Tips and Tricks, Part 2

In a previous post, we looked at five basic video production tools available to faculty and students at St. Thomas.  In this article, I offer some best-practice tips to increase the production value of your recordings. Because videos are often viewed independently online, it’s easy for the viewer to get distracted or multitask while watching. While you don’t have to be a “rock-star” to keep their attention, there are some basic things you can do to make your videos more engaging.

Video Engagement” is a way to track views and retention. The main take-away is that if you want your students to view the entire video, keep it short (5-10 min. or less). If you have more content to cover, consider splitting it into a Part 1, Part 2, etc. Keep your message moving and provide appealing visuals to help carry the content and help students nurture meaning.

Here are ten more tips and tricks for increasing the production value of your audio/video recordings.

  1. Sketch, storyboard, or script your message before recording begins! Even though it’s more work, you’ll find that all your efforts will pay off in the overall quality and impact of your video.
  2. Good video can’t make up for bad audio! Use a good microphone and minimize extraneous noises. If people can’t hear clearly, you won’t get your message across no matter how awesome the video is.
  3. Use well-lit, well-balanced room lighting to light the subject but avoid shadows!  Be careful not to shine a harsh light directly on the subject, nor record in front of windows open to the sunlight.
  4. Control your environment as much as possible! This includes distracting room noise, visual distractions, people and pets. It’s best to be in a quiet, well-lit space.
  5. Frame the shot to capture what’s most important, and then some! Balance your subject in the shot so it’s large enough to be visible, but not too close to be distracting. A little background helps provide context.
  6. Think about what you’re wearing! Avoid wearing pin-stripes or anything distractable. Select clothing that will be in high contrast to the background so you don’t blend in or get lost in the background.
  7. Make sure the text is readable on all slides! Leave plenty of white-space around the text. Choose contrasting colors for text and images. Remember, each screen displays colors differently.
  8. Use headphones and a good microphone during live web-conference situations! This minimizes audio interference and feedback.
  9. All video content need to be close-captioned! This helps all learners. Check out the Close-Caption Request form on the STELAR website.
  10. Check out St. Thomas’ LinkedIn Learning for good examples of videos and tutorials that help with video recording, editing and producing.

Following a few simple tips can make all the difference between students actually watching what you produce, or just skipping through it. After all, if “content delivery” is the primary reason for creating videos, don’t give them a reason for not wanting to watch.

If you’re interested in getting the most out of your pre-recorded videos, but could use a little more guidance, feel free to contact STELAR to request a consultation around your next audiovisual recording project.

This post was written by Michael Wilder, an Instructional Designer for the St. Thomas E-Learning and Research (STELAR) Center at the University of St. Thomas in St. Paul, Minn. To learn more about this topic, please visit our website at www.stthomas.edu/stelar or email us at stelar@stthomas.edu.

Technology Tools

Basic Video Production Tips and Tricks, Part 1

In my role as an Instructional Designer, I often get asked by faculty questions like: “How do I go about recording my lectures?” or “Can I record my PowerPoint slides and put them in my hybrid or online course?”

The simple answer, I’m happy to tell them, is “Yes!” This is a great way to provide an alternative to your in-class lectures and get you one step closer to moving toward a flipped format or a blended or online course should you choose to go there. Pre-recorded video content is becoming more common-place in higher education and for good reason. First, students can watch your lectures outside of class (flipped classroom model), regaining valuable class time for group problem-solving and team-work. Students can re-watch videos, pausing and rewinding for comprehension and review. And, all learners can benefit from having course materials that support multiple means of representation.

But knowing what to do and how to do it, are two different things completely (as my father would famously remind me).  In this article and the next, I would like to offer some basic video production tips and tricks as a starting point for creating the kind of video presentations you can be proud of.

Creating video content for course instruction and assignments generally involves these four stages (in order):

  1. Recording,
  2. Editing,
  3. Hosting, and
  4. Sharing

The good news is that St. Thomas faculty and students have several tools and resources available to them for creating and sharing quality video content for academic purposes (reference the table below). Most of these are easily accessed and described in more detail, on One.StThomas. Each tool has its own methods and capabilities, although there’s a surprising amount of overlap too.

To identify which tool or method may be best for the video content you want to produce, start by asking yourself these questions:

  • Do I need to display any material visually, or will students just need to see me?
  • What format is the material in that I need to display?  PowerPoint slides? Images or  Documents? Websites? Software application?
  • Will this be a one-way communication from me to my students, or do I want students to respond as they pause and comment directly in the video? (yeah, that’s a thing)
  • Do I need a controlled environment for the best quality sound and lighting?
  • Do I need to demonstrate some action or use props?
  • How will the students access and see the final presentation?

While this article focuses on basic video production tools, it should be noted that St. Thomas has a full-service video production studio in the basement of OEC. The ITS/STELAR team can assist with any high-level production needs beyond the scope of what’s covered here. It may also help to consult with a STELAR Instructional Designer who can guide you through the process and, based on your specific instructional needs, point you to specific tools and solutions.

Here’s a break-down comparing five basic video recording tools and methods available at St. Thomas.

Video Production Tools

Video Production Tools (Chart)


With a little planning and creativity, the tools in the chart above can provide you with everything you need to successfully create, edit, host, and share videos for course content and interaction.

In the next article, I’ll offer some best practices for getting the most out of your video and audio recording, so your students get the most out of learning by watching them.

This post was written by Michael Wilder, an Instructional Designer for the St. Thomas E-Learning and Research (STELAR) Center at the University of St. Thomas in St. Paul, Minn. To learn more about this topic, please visit our website at www.stthomas.edu/stelar or email us at stelar@stthomas.edu.

STELAR Partnerships with Faculty

STELAR presents workshops at the STAR Symposium

St. Thomas staff members from STELAR recently presented at the STAR Symposium, a virtual-only conference hosted by the Minnesota Online Quality Initiative.  The conference held on February 8, drew approximately 155 participants from around the state and country, with a large representation from Minnesota state colleges and universities.  The all-day Symposium was conducted in a Zoom webinar format.

One of STLEAR’s Instructional Designers, Michael Wilder, offered a workshop called “Increasing Engagement with Multimedia-based Projects & Presentations” which had approximately 58 attendees in the afternoon session.

In his workshop, Wilder heightened awareness of instructional video and the importance it plays for students. Participants learned about non-complex strategies for using video to deliver instruction. They also explored options for creating multimedia projects and presentations that can increase interaction and engagement. Taken from his workshop description:

Video is the new “text” for 21st century learners and is replacing traditional delivery systems as a way to communicate content and demonstrate authentic learning. Today’s students consume much more video than they read in text.* Using multimedia video in your course opens up options for communicating and presenting your subject in ways two-dimensional text just can’t do.

Wilder’s presentation materials can be accessed here.

Jo MontieLisa Burke, and John Kinsella presented a session called “Online Orientation Learning Sites: Student Success Resources” and shared the story about STELAR’s development of two student orientation and success sites.  

The presenters illustrated numerous benefits in using Canvas, our learning management system (LMS), to attend to student onboarding needs in online, blended and face to face programs. 

They shared a student success framework from the ECAR Study of Undergraduate Students and Information Technology, 2018 Report (Galanek, Gierdowski, & Brooks, 2018). The findings illuminate ways that success tools benefit students, and emphasize ways to involve faculty and staff who play pivotal roles in helping students notice and use digital success tools.  

The presenters also shared how a self-assessment tool can assist students to better identify what they already know (which helps them to better connect new learning to prior learning) and points them to content that addresses their own prioritized needs.

Many of the 59 attendees in this session, engaged in the conversation via chat which reflects a shared commitment and high interest around creating effective orientation experiences with students.  

See the Online Orientation presentation materials.

Our St. Thomas team members found significant benefit in the task of preparing to share our collective learning (we practiced with each other!); then the actual presenting and interacting with participants sparked further learning.  

In addition, that opportunity to attend other Star Symposium sessions widened our own understandings about what is possible and might be possible. For example, attending the conference modeled numerous best practices around using video conferencing tools (like Zoom) for an entire all online conference, including the importance of having room moderators in an online conference. 

This post was co-written by Michael Wilder and Jo Montie on behalf of the St. Thomas E-Learning and Research (STELAR) Center at the University of St. Thomas in St. Paul, Minn. Please visit our website at www.stthomas.edu/stelar or email us at stelar@stthomas.edu.

Technology Tools

VoiceThread’s New Features

VoiceThread– the online discussion platform that incorporates voice, video, and images, continues to improve their cloud-based interface. Many faculty and students at the University of St. Thomas use VoiceThread as a way to increase engagement and social presence in online learning.

Here are two new features that will make using VoiceThread even easier and more accessible:

Interactive Video Commenting

Now you can “insert your comment directly into the video’s timeline while also interacting with it dynamically as you record,” according to VoiceThread.   Here’s how it works:

Stop the playback of any video playing in VoiceThread. Click the + button to start recording your comment. You can ask questions about a particular thing right within the video, or describe and draw directly on a certain frame within the video.  You can even move the video’s timeline and comment along the way.  Any movements you make (scrubbing, annotating) while making your comments are recorded right along with your comments so when others view your comments, they see how you are interacting with the video.

Use this feature when you need to stop and ask questions at a specific time in the video. You can also use it to point out elements of a diagram or describe a stop-motion happening in the video.

Closed Captioning of all Comments

VT-captions-ON

Beginning in March, all comments that professors and students make will be closed captioned for accessibility.

This will happen automatically behind the scenes and will appear directly on the comment after processing. To view the captions, viewers need to turn on Closed Captions during playback from the CC menu in the upper-right. With this update, there will be no more requesting that VoiceThreads be sent off for captioning or waiting several days for the captions to appear. While captions are machine processed immediately and probably won’t be 100% accurate, you now have the ability to edit those captions anytime you want.

VT-edit-captions

Simply click the “CC” icon on the individual caption and then click Edit Captions to correct the machine captions.

To find more exciting features being developed by VoiceThread, check out the VoiceThread Roadmap.


This post was written by Michael Wilder, an Instructional Designer for the St. Thomas E-Learning and Research (STELAR) Center at the University of St. Thomas in St. Paul, Minn. To learn more about this topic, please visit our website at www.stthomas.edu/stelar or email us at stelar@stthomas.edu.