Best Practices, Tips, and Tricks – St. Thomas E-Learning And Research - Page 3
Browsing Category

Best Practices, Tips, and Tricks

Canvas: Did you know...?, Technology Tools

New Canvas Feature: Personal Pronouns

Canvas has added a new feature that allows users to identify their personal pronounsYour chosen pronouns follow your name and show up basically anywhere your name appears within Canvas. That includes places like discussion posts, grading fields, announcements sent by instructors, groups pages, and messages. 

Why should I set up my pronouns? 

St. Thomas is excited Canvas has made this feature available and we’ve chosen to enable it for our Canvas users.  

Enabling this feature supports the university’s commitment to diversity. Identifying your pronouns helps others know how to address you (and lets you know the proper way to address others). In our increasingly digital world, knowing the proper way to address one another helps to build community. 

How denable the pronouns feature in Canvas? 

Identifying your pronouns in Canvas is an optional feature. If you wish to enable the feature and identify your pronouns, go to your User Settings and follow the instructions in the Canvas Personal Pronouns tutorial.

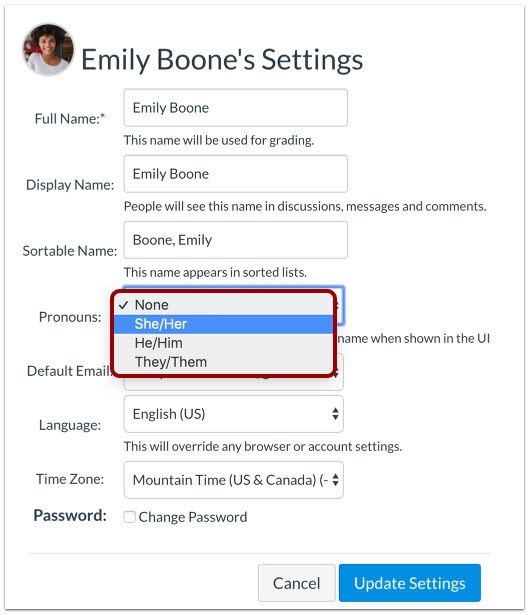
What if my pronouns aren’t available in the menu 

Only pronouns set by the Canvas admin will show up in the drop-down menu. If your pronouns aren’t there, let us know! Send an email to stelar@stthomas.edu and include the pronouns you’d like added to the dropdown menu. 

Canvas 24/7 Help 

If you need assistance in setting up your pronouns, please contact Canvas’s 24/7 Help. Find your help options by clicking on the Help icon in the purple menu at the left (when logged in to Canvas).


This post was written by Nancy McGinley Myers, Instructional Designer with the St. Thomas E-Learning and Research (STELAR) Center at the University of St. Thomas in St. Paul, Minn. To learn more about what STELAR can do for you, please visit our website at  www.stthomas.edu/stelar or email us at stelar@stthomas.edu.

Best Practices, Tips, and Tricks, Technology Tools

Canvas Training Services Portal

Canvas has unveiled a new, robust Training Services Portal with both live webinars and on-demand, online training. Learn all about Canvas from setting up a course, to developing assessments, grading, instructional design basics, course communication, and more.

To access Canvas Webinars and Self-Paced Training: 

  1. Log in to Canvas. 
  2. Click the Help icon in the global navigation (at the bottom of the purple menu bar at the left). 
  3. Chose Training Services Portal from the pop-up menu. 

When you are logged in to Canvas Training Services, use the Learning Library to explore on-demand self-paced trainings. Use the Training Calendar to find live webinar training. Canvas has also created a detailed tutorial on how to access and use the Training Services Portal.

For brand new users of Canvas, we recommend starting with Higher Education: First Day Ready. This course includes training in configuring your notification preferences, utilizing the dashboard, creating a home page and modules, getting started with assignments and other assessments, and grading and feedback. It’s a comprehensive training that will get you and your course ready for the first day.

First Day Ready card

This post was written by Nancy McGinley Myers, Instructional Designer with the St. Thomas E-Learning and Research (STELAR) Center at the University of St. Thomas in St. Paul, Minn. To learn more about what STELAR can do for you, please visit our website at  www.stthomas.edu/stelar or email us at stelar@stthomas.edu.

Canvas: Did you know...?, Technology Tools

New Gradebook In Canvas

Canvas is rolling out a new gradebook to all users this winter, and we think you’re going to like the new features. St. Thomas is going to switch from the old gradebook to the new one on January 3, 2020 to accommodate posting Fall 2019 grades and the start of J-Term 2020.

New Features:

To see a list of all the changes, please view the complete functionality comparison chart. Here are three exciting new features that will help you streamline your grading and reporting:

Enhanced Features:

To see a complete list of enhancements made to current features, please view the complete functionality comparison chart. The following feature enhancements might be especially handy:

  • In the old gradebook you could only sort student names alphabetically by last name. In the new gradebook, you’ll be able to sort students by first or last name, sort alphabetically, and choose which secondary information (like username or group) you’d like to show.
  • You have much more control over the arrangement of your assignment columns with the new gradebook. You can arrange by name, due date, points, or module.
  • You can also filter your columns by assignment group, modules, and/or section. In the old gradebook, you could only filter by section.
  • The new gradebook allows you to mute all assignments by default (by selecting the manual post option) in Grade Posting Policies.

Features that Still Exist but Have Moved:

Looking for an old feature, but can’t find it? Quite a few features have either moved to another location in the gradebook, or their icons have changed. To see a full list, have a look at the functionality comparison chart.

Getting Help

Looking for something in the New Gradebook, but can’t find it? Trying to make sense of new icons and locations? Canvas has multiple help options for you:

  • Look through the New Gradebook Instructor Guide to see if you can find an answer to your question.
  • Contact Canvas help if you have any issues setting up your new gradebook. They are available 24/7 via phone or chat.

This post was written by Nancy McGinley Myers, an Instructional Designer for the St. Thomas E-Learning and Research (STELAR) Center at the University of St. Thomas in St. Paul, Minn. To learn more about this topic, please visit our website at www.stthomas.edu/stelar or email us at stelar@stthomas.edu.

Best Practices, Tips, and Tricks, Technology Tools

Basic Video Production Tips and Tricks, Part 2

In a previous post, we looked at five basic video production tools available to faculty and students at St. Thomas.  In this article, I offer some best-practice tips to increase the production value of your recordings. Because videos are often viewed independently online, it’s easy for the viewer to get distracted or multitask while watching. While you don’t have to be a “rock-star” to keep their attention, there are some basic things you can do to make your videos more engaging.

Video Engagement” is a way to track views and retention. The main take-away is that if you want your students to view the entire video, keep it short (5-10 min. or less). If you have more content to cover, consider splitting it into a Part 1, Part 2, etc. Keep your message moving and provide appealing visuals to help carry the content and help students nurture meaning.

Here are ten more tips and tricks for increasing the production value of your audio/video recordings.

  1. Sketch, storyboard, or script your message before recording begins! Even though it’s more work, you’ll find that all your efforts will pay off in the overall quality and impact of your video.
  2. Good video can’t make up for bad audio! Use a good microphone and minimize extraneous noises. If people can’t hear clearly, you won’t get your message across no matter how awesome the video is.
  3. Use well-lit, well-balanced room lighting to light the subject but avoid shadows!  Be careful not to shine a harsh light directly on the subject, nor record in front of windows open to the sunlight.
  4. Control your environment as much as possible! This includes distracting room noise, visual distractions, people and pets. It’s best to be in a quiet, well-lit space.
  5. Frame the shot to capture what’s most important, and then some! Balance your subject in the shot so it’s large enough to be visible, but not too close to be distracting. A little background helps provide context.
  6. Think about what you’re wearing! Avoid wearing pin-stripes or anything distractable. Select clothing that will be in high contrast to the background so you don’t blend in or get lost in the background.
  7. Make sure the text is readable on all slides! Leave plenty of white-space around the text. Choose contrasting colors for text and images. Remember, each screen displays colors differently.
  8. Use headphones and a good microphone during live web-conference situations! This minimizes audio interference and feedback.
  9. All video content need to be close-captioned! This helps all learners. Check out the Close-Caption Request form on the STELAR website.
  10. Check out St. Thomas’ LinkedIn Learning for good examples of videos and tutorials that help with video recording, editing and producing.

Following a few simple tips can make all the difference between students actually watching what you produce, or just skipping through it. After all, if “content delivery” is the primary reason for creating videos, don’t give them a reason for not wanting to watch.

If you’re interested in getting the most out of your pre-recorded videos, but could use a little more guidance, feel free to contact STELAR to request a consultation around your next audiovisual recording project.

This post was written by Michael Wilder, an Instructional Designer for the St. Thomas E-Learning and Research (STELAR) Center at the University of St. Thomas in St. Paul, Minn. To learn more about this topic, please visit our website at www.stthomas.edu/stelar or email us at stelar@stthomas.edu.

Best Practices, Tips, and Tricks, Technology Tools

Utilizing Library Resources in Canvas

shelves full of books

St. Thomas has a handy tool for helping you integrate library resources into your Canvas sites. The Resource List is easy to set up, saves students money by using existing library resources, connects you with librarians who may be able to provide copyright guidance and management, and simplifies linking.

STELAR has just developed a self-paced, online Resource List training. This training will teach you how to set up your Resource List, add and link items, and identify special considerations such as accessibility and copyright.

For more information on reducing course materials costs for students, please see Greg Argo’s previous post: Reduce Course Materials Costs, We’ll Help.

This post was written by Nancy McGinley Myers, Instructional Designer with the St. Thomas E-Learning and Research (STELAR) Center at the University of St. Thomas in St. Paul, Minn. To learn more about this topic, please visit our website at www.stthomas.edu/stelar or email us at stelar@stthomas.edu. For more information on training available through STELAR, please see our Training & Events page.