In my role as an Instructional Designer, I often get asked by faculty questions like: “How do I go about recording my lectures?” or “Can I record my PowerPoint slides and put them in my hybrid or online course?”
The simple answer, I’m happy to tell them, is “Yes!” This is a great way to provide an alternative to your in-class lectures and get you one step closer to moving toward a flipped format or a blended or online course should you choose to go there. Pre-recorded video content is becoming more common-place in higher education and for good reason. First, students can watch your lectures outside of class (flipped classroom model), regaining valuable class time for group problem-solving and team-work. Students can re-watch videos, pausing and rewinding for comprehension and review. And, all learners can benefit from having course materials that support multiple means of representation.
But knowing what to do and how to do it, are two different things completely (as my father would famously remind me). In this article and the next, I would like to offer some basic video production tips and tricks as a starting point for creating the kind of video presentations you can be proud of.
Creating video content for course instruction and assignments generally involves these four stages (in order):
- Recording,
- Editing,
- Hosting, and
- Sharing
The good news is that St. Thomas faculty and students have several tools and resources available to them for creating and sharing quality video content for academic purposes (reference the table below). Most of these are easily accessed and described in more detail, on One.StThomas. Each tool has its own methods and capabilities, although there’s a surprising amount of overlap too.
To identify which tool or method may be best for the video content you want to produce, start by asking yourself these questions:
- Do I need to display any material visually, or will students just need to see me?
- What format is the material in that I need to display? PowerPoint slides? Images or Documents? Websites? Software application?
- Will this be a one-way communication from me to my students, or do I want students to respond as they pause and comment directly in the video? (yeah, that’s a thing)
- Do I need a controlled environment for the best quality sound and lighting?
- Do I need to demonstrate some action or use props?
- How will the students access and see the final presentation?
While this article focuses on basic video production tools, it should be noted that St. Thomas has a full-service video production studio in the basement of OEC. The ITS/STELAR team can assist with any high-level production needs beyond the scope of what’s covered here. It may also help to consult with a STELAR Instructional Designer who can guide you through the process and, based on your specific instructional needs, point you to specific tools and solutions.
Here’s a break-down comparing five basic video recording tools and methods available at St. Thomas.
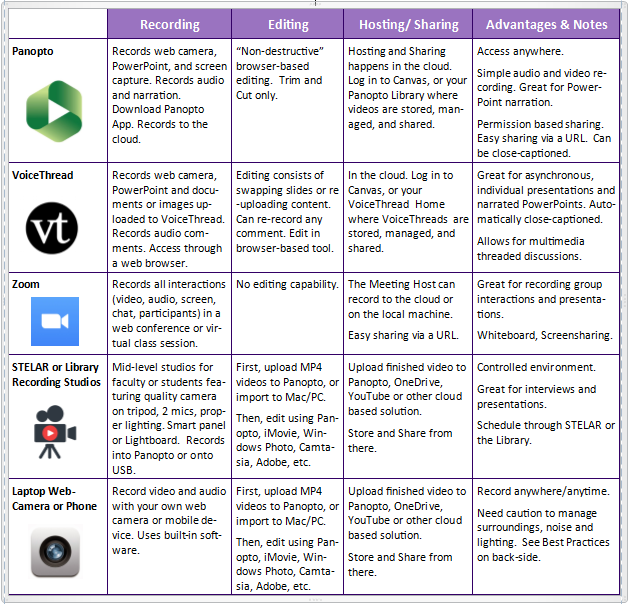
Video Production Tools (Chart)
With a little planning and creativity, the tools in the chart above can provide you with everything you need to successfully create, edit, host, and share videos for course content and interaction.
In the next article, I’ll offer some best practices for getting the most out of your video and audio recording, so your students get the most out of learning by watching them.
This post was written by Michael Wilder, an Instructional Designer for the St. Thomas E-Learning and Research (STELAR) Center at the University of St. Thomas in St. Paul, Minn. To learn more about this topic, please visit our website at www.stthomas.edu/stelar or email us at stelar@stthomas.edu.
No Comments